本文用于记录博客修缮过程 由于博客过于人机所以想要美化一下
借鉴文章:
Hexo-butterfly美化基础教程(一) | J1Zh0n9の小屋
Butterfly主题一图流背景及文章顶部图修改_butterfly设置背景图-CSDN博客
注意:本文中代码中的 + - 为添加加号要舍弃, - -为去除
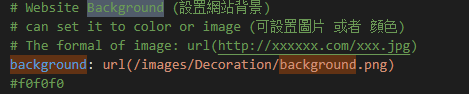
一图流 修改\ROOT\themes\butterfly_config.yml
编辑其中的 index_img、background、footer_bg 选项。
新建styl文件
在ROOT\themes\butterfly\source\css\page目录,新建topimg.styl。
1
2
3
4
5
6
7
8
9
10
11
12
13
14
15
16
17
18
19
20
21
22
23
24
25
26
// 顶部图 background-color: transparent !important background-image: unset !important .top-img height: 12. 5rem display: block margin: -50px -40px 50px -40px border-top-left-radius: inherit border-top-right-radius: inherit background-position: center center -webkit-background-size: cover -moz-background-size: cover background-size: cover background-repeat: no -repeat transition: all 0. 3s .read-mode display: none @media screen and (max-width: 768px) margin: -1. 8rem -0. 7rem 1. 8rem -0. 7rem [data-theme='dark' ] & filter: brightness(0.8)
修改post.pug
在ROOT\themes\butterfly\layout目录,打开post.pug,将其修改为以下。(注意保持缩进一致)
1
2
3
4
5
6
7
8
9
10
11
12
13
14
15
16
17
18
19
20
21
22
23
24
25
26
27
28
29
30
31
32
33
34
35
36
37
38
39
40
41
42
43
44
extends includes/layout.pug block content #post if top_img === false include includes/header/post-info.pug .top -img.gist (style="display: none;" ) article#article-container.post -content!=page.content include includes/post/post-copyright.pug .tag_share if (theme.post_meta .post .tags ) .post -meta__tag-list each item, index in page.tags .data a (href=url_for (item.path )).post -meta__tags #[=item.name ] include includes/third-party/share/index.pug if theme.reward .enable && theme.reward .QR_code !=partial ('includes/post/reward' , {}, {cache : true }) if theme.ad && theme.ad .post .ads -wrap!=theme.ad .post if theme.post_pagination include includes/pagination.pug if theme.related_post && theme.related_post .enable != related_posts (page,site.posts ) if page.comments !== false && theme.comments && theme.comments .use - var commentsJsLoad = true !=partial ('includes/third-party/comments/index' , {}, {cache : true })
在这里我去掉了顶部图想要顶部图的可以沿用下面这段代码、
1
2
3
4
5
6
block content #post if top_img === false include includes/header/post-info.pug .top -img.gist (style=`background-image: url(${url_for(top_img)} )` ) article#article-container.post -content!=page.content
修改背景亮度
默认的黑夜模式亮度较低,可以根据背景适当调整
在\themes\butterfly\source\css\_mode目录,打开darkmode.styl,将background-color的值调低。
1 2 3 4 5 6 position: absolute width: 100 % height: 100 % background-color: alpha($dark-black, .4 ) content: ''
置顶轮播文章 Swiper Bar | Akilarの糖果屋
1.安装插件
1 npm install hexo-butterfly-swiper --save
2.添加配置信息,在\ROOT\themes\butterfly_config.yml中找位置直接粘贴就好
1 2 3 4 5 6 7 8 9 10 11 12 13 14 15 16 swiper: enable: true priority: 5 enable_page: all timemode: date layout: type: id name: recent-posts index: 0 default_descr: 再怎么看我也不知道怎么描述它的啦! swiper_css: https://npm.elemecdn.com/hexo-butterfly-swiper/lib/swiper.min.css swiper_js: https://npm.elemecdn.com/hexo-butterfly-swiper/lib/swiper.min.js custom_css: https://npm.elemecdn.com/hexo-butterfly-swiper/lib/swiperstyle.css custom_js: https://npm.elemecdn.com/hexo-butterfly-swiper/lib/swiper_init.js
想置顶文章需要在文章头添加以下信息
1
2
3
4
5
6
7
8
--- title: 文章标题 date: 创建日期 updated: 更新日期 cover: 文章封面 description: 文章描述 swiper_index: 1 #置顶轮播图顺序,非负整数,数字越大越靠前 ---
页面样式调节 详见:Fomalhaut🥝
通过css样式调节各个页面的透明度、模糊度(亚克力效果)、圆角、边框样式等。
在\themes\butterfly\source\css目录下创建一个自定义的custom.css文件在里面放我们自定义的css样式
1
2
3
4
5
6
7
8
9
10
11
12
13
14
15
16
17
18
19
20
21
22
23
24
25
26
27
28
29
30
31
32
33
34
35
36
37
38
39
40
41
42
43
44
45
46
47
48
49
50
51
52
53
54
55
56
57
58
59
60
61
62
63
64
65
66
67
68
69
70
71
72
73
74
75
76
77
78
79
:root { --trans-light : rgba (220 , 226 , 250 , 0.85 ); --trans-dark : rgba (15 , 20 , 40 , 0.85 ); --border-style : 1px solid rgba (130 , 140 , 200 , 0.3 ); --backdrop-filter : blur (8px ) saturate (120% ); --accent-warm : rgba (255 , 210 , 100 , 0.8 ); } #recent-posts > .recent-post-item { background : var (--trans-light); backdrop-filter : var (--backdrop-filter); border-radius : 25px ; border : var (--border-style); box-shadow : 0 4px 15px rgba (10 , 15 , 30 , 0.1 ); } #aside-content .card-widget { background : var (--trans-light); backdrop-filter : var (--backdrop-filter); border-radius : 18px ; border : var (--border-style); } div #post ,div #page ,div #archive { background : var (--trans-light); backdrop-filter : var (--backdrop-filter); border : var (--border-style); border-radius : 20px ; } [data-theme="dark" ] #recent-posts > .recent-post-item ,[data-theme="dark" ] #aside-content .card-widget ,[data-theme="dark" ] div #post ,[data-theme="dark" ] div #archive ,[data-theme="dark" ] div #page { background : var (--trans-dark); border : 1px solid rgba (100 , 110 , 180 , 0.2 ); } [data-theme="dark" ] #footer ::before ,[data-theme="dark" ] #page-header ::before { background : transparent !important ; } .read-mode #aside-content .card-widget ,.read-mode div #post { background : rgba (250 , 245 , 230 , 0.85 ) !important ; border-color : rgba (255 , 210 , 100 , 0.3 ) !important ; } [data-theme="dark" ] .read-mode #aside-content .card-widget ,[data-theme="dark" ] .read-mode div #post { background : rgba (20 , 25 , 50 , 0.95 ) !important ; color : #e0e5ff ; border-color : rgba (130 , 140 , 200 , 0.4 ) !important ; } a { color : #d4a024 ; } a :hover { color : #ffc857 ; }
参数说明:
--trans-light:白天模式带透明度的背景色,如rgba(255, 255, 255, 0.88)底色是纯白色,其中0.88就透明度,在0-1之间调节,值越大越不透明;--trans-dark: 夜间模式带透明度的背景色,如rgba(25, 25, 25, 0.88)底色是柔和黑色,其中0.88就透明度,在0-1之间调节,值越大越不透明;--border-style: 边框样式,1px solid rgb(169, 169, 169)指宽度为1px的灰色实体边框;--backdrop-filter: 背景过滤器,如blur(5px) saturate(150%)表示饱和度为150%的、高斯模糊半径为5px的过滤器,这是亚克力效果的一种实现方法;大家可以根据自己喜好进行调节
在主题配置文件_config.yml的inject配置项中引入该css文件:
1
2
3
inject: head: + - <link rel="stylesheet" href="/css/custom.css">
宽屏适配+非首页隐藏侧边栏 参考:Fomalhaut🥝博客魔改四博客宽屏适配(自用)
1.在custom.css中加入以下样式
1 2 3 4 5 6 7 8 9 10 11 12 13 14 15 16 17 18 .layout { max-width : 1300px ; } .aside-content { max-width : 318px ; min-width : 300px ; } @media screen and (max-width : 900px ) { .aside-content { max-width : none !important ; padding : 0 5px 0 5px ; } }
2.想要不在非首页的地方显示侧边栏需要给非首页的页面加上标记,修改\themes\butterfly\layout\includes\layout.pug
1
2
3
4
5
6
7
8
9
- var htmlClassHideAside = theme.aside.enable && theme.aside.hide ? 'hide-aside' : '' - page.aside = is_archive() ? theme.aside.display.archive: is_category() ? theme.aside.display.category : is_tag() ? theme.aside.display.tag : page.aside - var hideAside = !theme.aside.enable || page.aside === false ? 'hide-aside' : '' - - var pageType = is_post() ? 'post' : 'page' + - var pageType = is_home() ? 'page home' : is_post() ? 'post' : 'page' doctype html html(lang=config.language data-theme=theme.display_mode class=htmlClassHideAside) ...
现在主页的class就变成page home了,我们再在custom.css加入如下css,主题就能智能区分主页和分页了,可以自动选择卡片显示
导航栏居中,字体放大 在\themes\butterfly\source\css新建一个nav.css方便魔改,然后在主题配置文件_config.yml中引入该文件
1
2
3
inject: head: - <link rel="stylesheet" href="/css/nav.css">
在css文件中添加以下内容
1 2 3 4 5 6 7 8 9 10 11 12 13 14 15 16 17 18 19 20 21 22 23 24 25 26 27 28 29 30 31 32 33 34 35 36 37 38 39 40 41 42 43 44 45 46 #nav .menus_items { position : absolute !important ; width : fit-content !important ; left : 50% !important ; transform : translateX (-50% ) !important ; } #nav .menus_items .menus_item :hover .menus_item_child { display : flex !important ; } .menus_items .menus_item :nth-child (2 ) .menus_item_child { left : -125px ; } #nav { position : absolute; top : 0 ; z-index : 90 ; display : flex; justify-content : center; align-items : center; padding : 0 25px ; width : 100% ; height : 60px ; font-size : 1.6em ; opacity : 0 ; transition : all .5s ; font-family : 'Comic Sans MS' , '幼圆' , 'Yuanti SC' , cursive, sans-serif; letter-spacing : 0.6px ; overflow : visible; } #nav #blog-info .site-name { text-shadow : 2px 2px 4px rgba (0 , 0 , 0 , 0.15 ); font-weight : bold; font-size : 1.6em !important ; color : var (--theme-color) !important ; margin : 0 5px ; }